
Sophos UTM and Active Directory Step by Step Integration Guide
This article explains how to integrate Sophos UTM and Active Directory SSO in six simple steps.
 Etienne Liebetrau
Almost all enterprises use Windows Active Directory as their authentication store. Any non-Windows system that would like to Integrate into such an environment needs to be configured to interact with the relevant Active Directory servers and services.
In this article we are going to step through the process of integrating Sophos UTM and Active Directory using the Active Directory Single Sign On feature. We will join a Sophos UTM device to a Windows Domain and define policies for certain Active Directory groups and users.
Step 1. DNS
Before a device can be joined to a domain, it needs to be able to resolve the relevant domain services. Sophos UTM can be configured to use various DNS configurations, but typically, there are only two main requirements. Resolve all internal DNS queries using an internal DNS server, and for all other queries, resolve them using an external/public DNS server.
Step 1.1. Confirm Public DNS Forwarders
- Select Network Services | DNS
- Select the Forwarders Tab
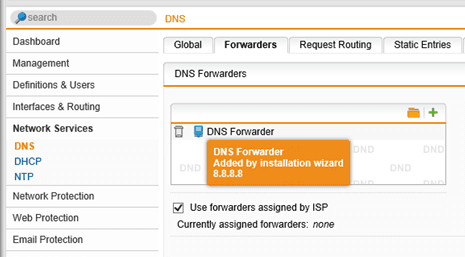
By default during the installation wizard a DNS forwarder is created. This can be any public DNS server such as Google’s 8.8.8.8 or 8.8.4.4. If the installation wizard did not create one, add a DNS forwarder that points to a public DNS server.
Step 1.2. Define Request Routing
- Select the Request Routing tab
- Click the \+ New DNS Request Route... button
- Specify your internal domain name
- Browse for or create your local DNS servers
- Click the Save button
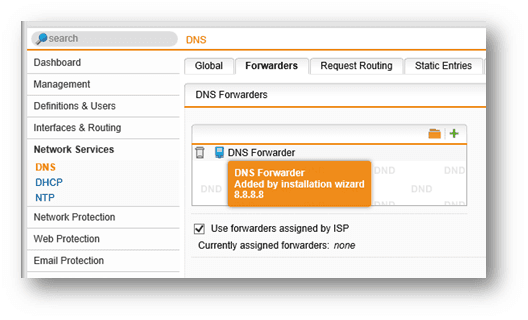
This configuration will now send all DNS queries for the internal domain to your internal DNS server while sending all other DNS queries directly to the external public DNS servers.
Step 1.3. Test internal and external DNS resolution
- Select Support | Tools
- Select the DNS Lookup tab
- In the hostname field, enter an external domain such as google.com, check “Enable verbose output” and click the Apply button
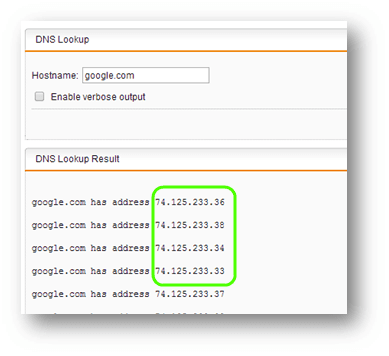
This should resolve the public DNS record from your public DNS server.
Repeat the process, but this time specify your own internal domain.
You should now see that external names resolve externally and internal names resolve internally.
Step 2. Join Sophos UTM to the Domain
This is taken directly from the Sophos UTM management interface.
To activate Single-Sign-On functionality, the system must join the Active Directory domain. Enter the domain name (e.g. ’intranet.yourcompany.com’) of the domain you wish to join, as well as the credentials of an admin user who is allowed to add computers to that domain.
To join Sophos UTM to your Windows domain:
- Select Definitions & Users | Authentication Servers
- Select the Single Sign-On Tab
- Enter your internal domain name along with the Username and Password of a user that has permission to create objects in AD
- Click the Apply button
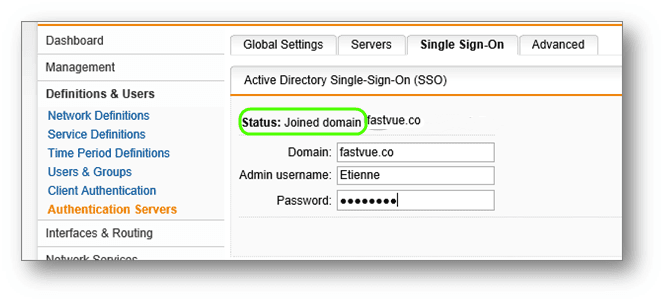
The join might take a minute or two. Green text will briefly display indicating a successful join. The Status line will also reflect that the Sophos UTM has joined the domain. If you like to double check you can also look for the object in Active Directory. It will be registered as a computer object similar to a domain joined PC.
Step 3. Specify Authentication Servers
In this step we will specify which Active Directory servers the Sophos UTM can use to query for groups, membership and also authenticate the user.
In order to do this, you need to know the distinguishedName (BIND DN) of the AD user account you are using for Sophos UTM.
Step 3.1. Find the AD User Account's distinguishedName
Firstly, find the canonical name of the user account you want to use for Sophos UTM
- On your domain controller, open Active Directory Users and Computers
- Select View | Advance Features
- Search for the domain account that will be used by the Sophos UTM. You can use the same account you used to Join Sophos UTM to the domain (See step 3 above) or create a new account specifically for Sophos UTM.
- In the Properties for the user account you will see the Object tab.
- Note the canonical name as it tells you where the object is in your Active Directory.
Now we can retrieve the distinguishedName for the account using ADSI Edit.aspx).
- Open ADSI Edit (Adsiedit.msc)
- Right-click the ADSI Edit root and click Connect to…
- The default settings should allow you to connect successfully, so just click OK
- You can now expand and browse the directory until you find the user account you want to use. This is where the canonical name comes in handy.
- Open the Properties of the user account
- In the attributes section scroll down to the distinguishedName
- Copy the distinguishedName to the clipboard (Double-click the entry to view and then copy).
Step 3.2. Define an Authentication Server
- Select Definitions & Users | Authentication Services
- Select the Servers tab
- Click the \+ New Authentication server button
- Select Active Directory as the Backend
- Next to the Server field click the + button
- Specify your Active Directory server name, and specify its IPv4 Address
- Click Save
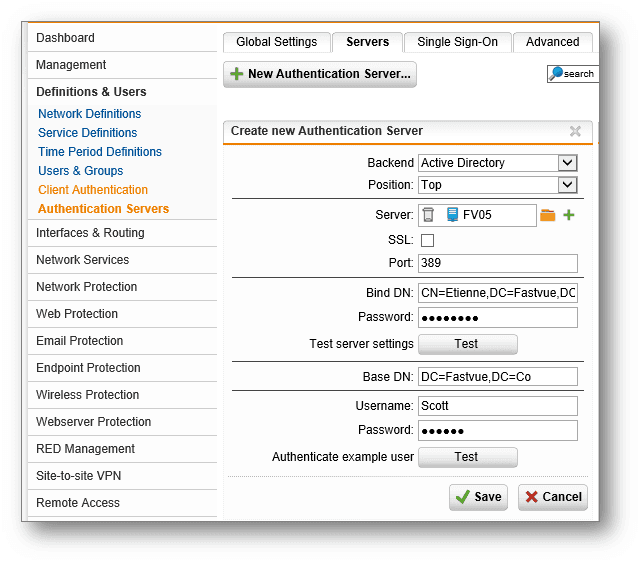
- For the BIND DN paste the distinguishedName of the AD account you want to use (see step 3.1 above)
- Password is the password for that account
- Click the Test button
If successful, you should get a small pop up saying "Server test passes". If not, please revise the steps above until the test succeeds.
The Base DN is the base from which user objects will be queried. The less specific, the larger the scope will be for the object to be searched.
- As a test, specify the base DN of your domain e.g. DC=fastvue,DC=co
- Specify the username and password for any AD account and the test should succeed
- You are now ready to save the Authentication Server
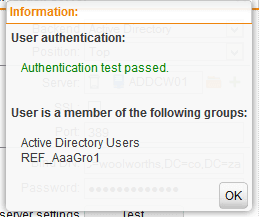
You can and should repeat this process for additional AD servers. Using the clone button makes it easy to retain the settings.
Step 4. Create Sophos UTM Groups Using Active Directory Groups
Sophos UTM can apply policies and rules to users or groups. These groups are however local groups to the Sophos UTM.
The Sophos UTM groups can determine its members by referencing an Active Directory group. I have found it makes administration much easier to simply match the names of the Sophos UTM Groups to the names of the AD Groups. This is purely a naming convention and not required.
To create a Sophos UTM group:
- Select Definitions & Users | Users & Groups
- Select the Groups tab
- Click the \+ New Group button
- Group Name: Same as AD Group Name
- Group Type: Backend membership
- Backend: Active Directory
- Check "Limit to backend group(s) membership"
- Click the folder icon to browse AD for groups
- Once you have found the group, drag it to the empty pane in the bottom of the popup window.
- Click the Save Button
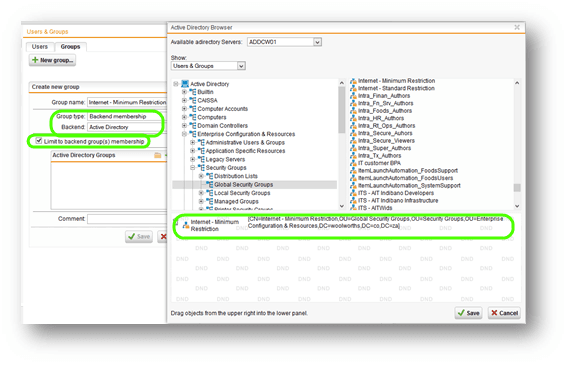
Repeat this process until you have all the groups that you want to use. Note: You can also add multiple Active Directory groups into a single Sophos UTM group.
Step 5. Use Active Directory Groups in Policies
Now that the Active Directory Integrated groups have been created you can use them in your Sophos UTM policies.
To configure the forward proxy to use these groups you need to do the following.
- Select Web Protection | Web Filtering
- Select the Global tab
- Make sure the mode is set to Standard Mode
- Set the Authentication mode to Active Directory SSO
- Click the folder icon and add the AD group(s) defined earlier
- Click the Apply Button
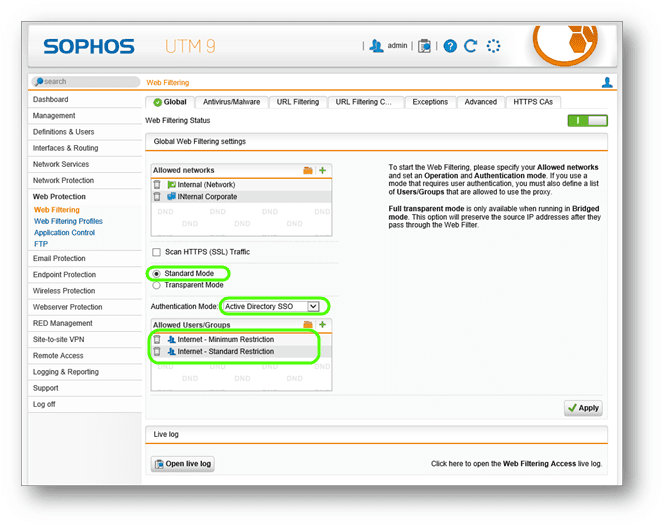
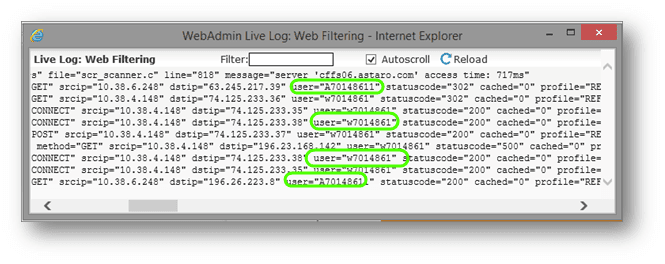
Domain joined Windows and Apple Mac OSX machines should now be able to use the proxy without being queried for credentials. You can verify this by checking the Live Log. Look for the user= field.
Step 6. Reporting on Authenticated Users in Sophos UTM
Authenticated user credentials are logged by Sophos UTM and can be viewed in the on-box reports. Unfortunately, the user account name can sometimes be a non-intuitive number such as a employee id, staff number or abbreviations.
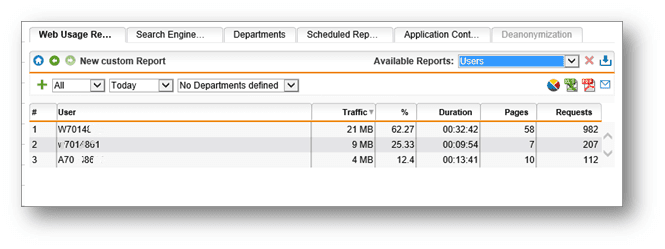
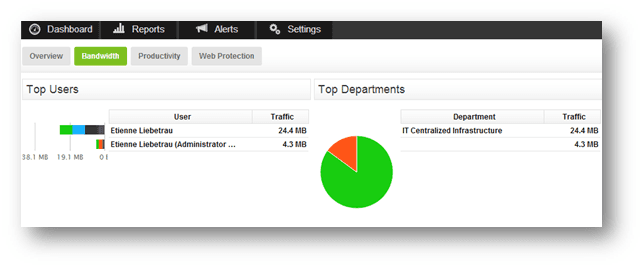
Fastvue Sophos Reporter solves this problem by mapping the user account back to the user's display name in Active Directory. Sophos Reporter also uses other Active Directory attributes such as 'department' to enable reporting by Department, Offices and Companies.
Summary
Integrating Sophos UTM with Active Directory is very simple and offers a range of benefits such as the ability to create user or group-based policies.
Web traffic is also logged with the authenticated username, allowing you to generate and distribute web activity reports for users and departments using Fastvue Sophos Reporter.
If you have any questions, please let me know in the comments!
9 Comments
Archived from our previous comment system.
- Ahmed Essam
can i ping to any internal pc recorded to internal dns using sophos !!, i mean when i create new object named DC with Domain IP 192.168.2.14 , then i go to support > tools > DNS Lookup i got faild reply
- Basil
you can use FQDN when you make a ping as example below
dc.internalDomain.local
- Ed
Once this is complete will it allow a user tof access the Web from a non-domain device like a phone without further authentication?
- Etienne Liebetrau
Hi Ed
After this is done the UTM can verify if a users credentials are valid or not. They way it gets those credentials is determined by the authentication settings. If set a web protection policy to be standard proxy and the authentication method to be active Directory SSO the UTM will transparent request credentials form the device. If the phone is configured to use a proxy in the wiFi network and credentials are specified then the web access will be transparent without any authentication challenges presented to the user.
- John Blue
Thank you for this really good guide.
Two items. First, while splitting DNS as described is doable, I think it should come with a disclaimer that it is optional configuration and things can break if not done correctly.
Second is using ADUC and then ADSI Edit to find the distinguishedname attribute sure is a long way around of getting it. My first thoughts were to open powershell and type:
get-aduser "username"
the distinguishedname attribute is the first line returned. Alternatively, the "Attribute Editor" tab of the user properties from ADUC is quicker than ADSI Edit.
John
- Etienne Liebetrau
Hi John
Thanks for highlighting the PowerShell and ADCU shortcuts.
Regards
Etienne
- Eren
Hey,
How do i setup a VPN connection integrated with Active Directory in Sophos.
Is there any way for this?Thank you in advance!
- Paul
In Single Sign-On tab, I entered username and password of admin on AD then I click Apply button and Status show: not joined to any domain. But I check on AD is that SOPHOS joined AD. Can you tell me why and how to fix that. Thank a lot.
- Etienne Liebetrau
Hi Paul
It sounds like you might have a locked AD object that is preventing the UTM from registering itself. I would proceed be making sure the UTM object is removed form AD. Then give it enough time to ensure that the removal has replicated to all domain controllers.
Start the process again and see what the results are. If the UTM still indicates that it is failing and the object re-appears in AD you might have a bug for the Sophos Support guys.
Regards
Etinene